Thread Inspection Of Pitch Diameter
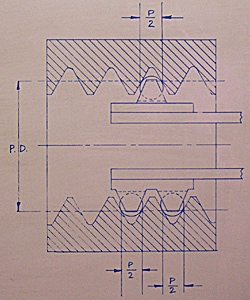
MTG, Inc. decided to look for answers by studying one of the most successful methods of gaging external threads, the 3-wire system. No one had ever seriously considered this system for internal threads before , it was obvious the physical characteristics of wires made it impossible to deploy and seat them in the tight convolutions of a female thread. But the principle was sound, so we overcame the physical problems by substituting ” floating balls” of Best Wire sizes for the actual wires. Held captive in caliper fingers and mounted on an indicating gage frame, the balls could be made to simulate three-wire inspection in internal threads, Figure 1.
Less Gaging Pressure
The use of balls, incidentally, eliminates perhaps the only significant shortcoming of wires. The problem is spelled out in Screw Thread Standards for Federal Services, under the heading Limitations of Three-Wire Measurement of External Threads: “When the lead angle and diameter of a thread are such that double contact of the measuring wires occurs, it will be necessary to check the pitch diameter by means of balls rather than wires. For accurate measurement with wires, single contact on each flank must occur. Measuring wires can be used if the following formula is satisfied for a specific thread.” Then follows a lengthy compensation formula developed by Werner F Vogel of The Van Keuren Co.
Because of the possibility that wires may make double contact in threads of certain lead and diameter combinations, Vogel’s equation calls for increased gaging pressure to seat the wires–as much as 2 1/2 Ib. in a 1/2-20 thread. This may result in deformation of the wire , the thread or both ! ! ! !
Replacing the wires with balls as we have done eliminates seating problems by making spheres rather than cylinders the method of contact. Gaging pressure need be only about 1 oz., or enough to satisfy the inspector that contact pressure is sufficient to register the size.
How Error Is Isolated
To understand how the ball principle isolates thread aspects for errorless measurement, let us first consider the key dimension in any thread; the pitch diameter. By definition, the pitch diameter is an imaginary cylinder along which each cut thread and each web of intervening metal have the same width: one-half the pitch, or P/2.
Traditionally, the pitch diameter has been checked with thread plug gages. If an inspector could enter the “Go” plug but not the “No Go,” the pitch diameter was considered to be within tolerance. Should the “Go” fail to enter, general practice was to deepen the cut until it did. Conversely, should the “No Go” enter, the cut would be made shallower to prevent its entry.
The blind spot in this procedure was that it assumed perfection in all other aspects of the internal thread. It ignored the fact that a thread cut to perfect depth will gage undersize if there is lead error, because the mis-matched leads of the thread and the plug gage will have interference. By the same token, a thread cut oversize and having lead error can pass thread plug inspection if the interference is not enough to block the “Go” but does prevent the “No Go” from entering.
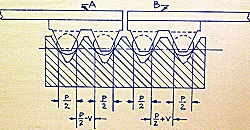
The floating ball system cannot be deceived by errors in lead or helix, no matter how severe or erratic (as in drunken threads), because the balls float laterally to find a perfect seat in the cuts regardless of the width of the metal between cuts, Figure 2. The balls are solid carbide, finished to Best Wire sizes, and will positively establish whether the tool is cutting to PD tolerance, since they measure diametrically across the threaded hole from cut to cut, not from cut to metal.
What is the importance of gaging from cut to cut? Simply stated, all diameters of a thread are functions of depth of cut. The cut is the constant, an exact matrix of the cutter at every point along the thread. The metal between cuts, however, is an unknown remainder whose P/2 width is a linear function dependent on the accuracy of the lead. A lead with a plus error will widen the metal between cuts; a minus error will narrow it; an erratic lead will result in inconstant widths. Unless the lead has been proved perfect in advance, checking the pitch diameter by using the metal as a gaging point is futile.
1. Section drawing shows three balls in
contact with pitch line of internal thread.
Isolating Subsequent Aspects
With the ability to isolate and accurately check the pitch diameter, it becomes a simple matter to inspect the remaining thread factors one at a time, isolating extraneous errors at each step. In our system, the same gage frame is provided with additional pairs of fingers, each with a separate function.
2. Floating action of the balls cancels out pitch errors in the metal between cuts (V) whether the error is minus as at (A) or plus as at (B).
How Accurate?
In this system, much thought has been given to the elimination of normally inherited errors. For example, the gage does not measure. It compares the work piece against an accepted reference such as a plain ring gage or gage blocks, and shows any variation on a dial indicator or electronic comparator. Fingers move on one plane only, along the axis of the indicator, so no radial or angular “scissors effect” errors can be introduced.
Problems of taper and out-of-round will not fool the system because its point-contact fingers reveal such conditions by displaying various readings when they are moved from one location to another around or along the thread. Repeatability of the MTG gage is excellent, since there is nothing to change successive readings except surface contaminants, and careful cleaning of critical parts can overcome this. The system is so accurate it can be used to certify thread ring gages on the job. In actual tests, it has detected and confirmed errors even in brand new adjustable thread ring gages.
Internal Thread Inspection
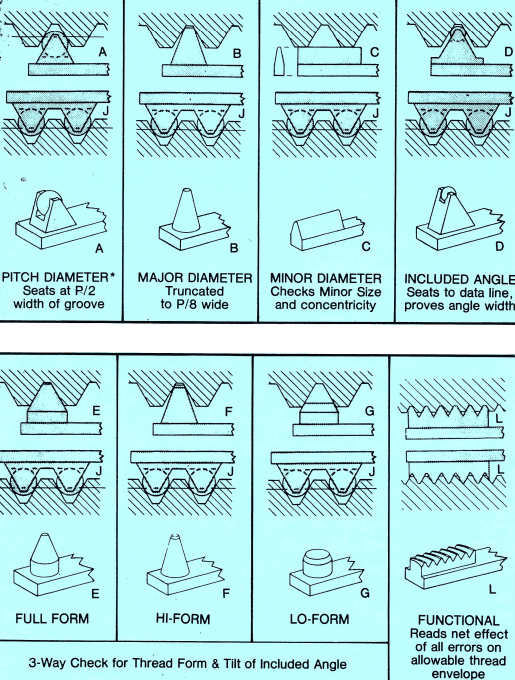
Thread plug gages can neither isolate compound errors in female threads nor reveal the amount of error. They merely suggest that “something is wrong.” Now the ”MTG System” lets the producer of internal threads make his own step-by-step analysis with a hand-held gage in a few minutes. Required data is obtained by use of interchangeable fingers shown on the chart below. Most significant of the fingers is ”J”, which contains two floating balls of “Best Wire Size”. These balls make contact at the P/2 width, or pitch circle of the thread grooves. Because they float, the balls will seat at the pitch circle whether the lead is short, long, correct or drunken. Finger “J” is used in conjunction with every upper finger in the thread series except the “Functional”, and provides an identical base line in every case!
MTG Zonal Method
PITCH (MINIMUM MATERIAL) DIAMETER
Fingers “A” and “J” both have tungsten carbide balls of “Best Wire Size”, and give a reading which excludes lead error but not angular errors. PD fingers can be used for right or left hand threads.
TAPER AND OVALITY
Use fingers “A” and “J” at intervals along thread for taper and around the thread for ovality.
INCLUDED ANGLE
Use fingers “D” and “J”. The ball in “D” is smaller than in pitch diameter finger “A”, and should seat a prescribed distance deeper. If it does not, angular error is present. The degree of error and its effect on P.D. can be determined by a formula.
MAJOR DIAMETER
Use fingers “B” and “J”
UNEQUAL HALF ANGLES
Opposite finger “J”, use “E”; then either “F” or “G”. “E” has full flanks, while “F” and “G” are limited to 0.1H contact. Where half-angles are unequal, the thread groove will be tilted, and ”E” will seat more shallow because its broader contact surfaces will meet greater interference from the tilted groove. The degree of tilt and its effect on PD is available through thread specification publications.
MINOR DIAMETER
Concentricity between minor and PD is measured by using fingers “C” and “J” . Minor diameter size, roundness and taper are checked with a pair of “C” fingers.
FUNCTIONAL (MAXIMUM MATERIAL) DIAMETER
Paired fingers “L” are helically ground for a single PD, pitch/lead combination which will measure the net effect of all errors.
SIMPLE SETTING METHOD (60 degree threads)
The MTG gage is set “over the balls” or “over the crests” with gage blocks, micrometers, super micrometers, or plain cylindrical ring gages. No threaded masters are needed.
The pitch diameter setting equals the pitch diameter (low, nominal or high) plus the ball radius. The ball diameter is etched on the pitch diameter fingers.
All contacts (except minor diameter) that are used opposite contact “J” are marked with a constant dimension thus: CD +.0214 or CD -.0261. Setting size is equal to the PD. setting plus or minus the constant dimension.
Functional fingers are marked with a specific setting size thus; OD .7501.
Paired minor diameter fingers are set exactly to the minor diameter size. When a single minor diameter finger is used opposite a ”J” finger to check concentricity, no precise setting is required.
Internal Thread Pitch Diameter Setting Size Calculators
( CLICK ON SELECTION– THEN CLICK ON “ENABLE EDITING” TO ENTER YOUR INFORMATION )
UNIFIED & METRIC SETTING SIZE.xlsx
WHITWORTH THREAD SETTING SIZE.xlsx
BUTTRESS THREAD SETTING SIZE.xlsx
(IMPORTANT! BUTTRESS FORMULA FOR 7/45 DEG ONLY)
External Thread Inspection
MTG Zonal Method
PITCH (MINIMUM MATERIAL) DIAMETER
Inserts “A” and “J” both contain balls of Best Wire size, and give a reading which excludes lead error but not angular errors. The PD inserts can be used for both left hand and right hand threads.
TAPER AND OVALITY
Use inserts “A” and “J” at intervals along the thread for taper, and around the thread for ovality.
INCLUDED ANGLE
Use inserts “D” and “J”. The ball in “D” is smaller than that in Pitch Diameter insert “A”, and should seat a prescribed distance deeper. If it does not, angular error is present. The degree of error and its effect on PD can be determined by using a formula.
UNEQUAL HALF-ANGLES
Opposite insert “J”, use “E”; then either “F” or “G”. “E” has full flanks, while “F” and “G” are limited to 0.1H contact. Where half-angles are unequal the thread groove will be tilted, and “E” will seat more shallow because its broader contact surfaces will meet greater interference from the tilted groove. The degree of tilt and its effect on PD. is available through thread spec. publications.
MINOR DIAMETER
Use inserts “B” and “J”.
MAJOR DIAMETER
Concentricity between major and PD is checked by using inserts “C” and “J”. Major Diameter size, roundness and taper are checked by a pair of “C” inserts.
FUNCTIONAL (MAXIMUM) MATERIAL DIAMETER
Paired inserts (C) (functional) are Helically Manufactured for a single PD/Pitch/Lead combination. A separate pair is required for each combination.
SIMPLE SETTING METHOD (60 degree threads)
The PD inserts are set “between the balls”. The Pitch Diameter setting equals the low, nominal, or high PD minus the ball radius. The Functional Inserts are set with a supplied master.
All contacts (except Major Diameter) that are used opposite contact J are marked with a constant dimension thus: CD +.0214; or CD -.0261. Setting size is equal to the PD setting plus or minus the constant dimension.
Paired Major Diameter inserts are set exactly to Major Diameter size. When a single Major Diameter insert is used opposite a J insert to check concentricity, no precise setting is required. The inserts are brought into contact with the workpiece and the indicator is read for runout.
External Thread Pitch Diameter Setting Size Calculators
(CLICK ON SELECTION–THEN CLICK ON “ENABLE EDITING” TO ENTER YOUR INFORMATION)
O.D. UNIFIED & METRIC SETTING SIZE.xlsx
O.D. ACME THREAD SETTING SIZE.xlsx
O.D. WHITWORTH THREAD SETTING SIZE.xlsx
O.D. BUTTRESS THREAD SETTING SIZE.xlsx
(IMPORTANT! BUTTRESS FORMULA FOR 7/45 DEG ONLY)


